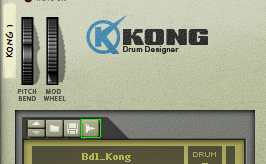
Wednesday, March 30, 2011

New Affiliate!


I'd like to take this post and dedicate it to my newest affiliate ChristianGear.com

ChristianGear and Barnes & Noble both help me out by working with me through an affiliate program.
To star shopping you can use the links below. With this program they share an small amount of the revenue with me. With this I will eventually be able to get this site a it's own domain name. So, by using the links below to make your orders, it helps the whole community out!


http://gan.doubleclick.net/gan_click?lid=41000000034531437&pubid=21000000000353327 


http://gan.doubleclick.net/gan_click?lid=41000000012871747&pubid=21000000000353327

Sunday, March 27, 2011

Sampling Input With Kong


Figure 1
        New in Reason 5 and Record 1.5 is the sampling feature. In devices that allow the use of samples there is a new icon that resembles an audio wave (Figure 1 indicated in green). When this button is pressed a sampling window is opened that begins recording immediately. Reason and Record automatically assigns an audio input from your computer to be the sampling input if one is available. For PC and mac, "built in input+built in output" should be selected in Reason and Records audio preferences to follow along with this tutorial.
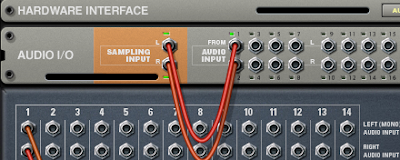
       In the rack, second from the top, is the Hardware Interface that contains the Sampling Input, Audio Input, and the Audio Output. If the correct audio inputs are selected, then the audio input being sampled will light up the input slots in the Audio Input section of the Hardware interface(Figure 2).
Figure 2


Figure 3


            Depending on your audio settings, Reason and Record will automatically route the first audio input to the sampling input. If the input comes through another channel rather than input channel 1 and 2 the input will need to be manually routed. To do this, flip the rack around and attach the correct "from" audio input channel cables to the Audio Inputs input. The routing should look similar to 'Figure 3' with the exception  of where your audio input is coming from.
         Now that the correct audio input has been routed to the Sampling Input, Flip the rack back around to check the signals. When you audio intended for sampling is played, its audio input channels and the Sampling Input should light up at the same time (Figure 2). To Ensure that your sampling device is routed correctly, refer to 'Figure 4.'
Figure 4


     Now that everything is routed correctly, by pressing the sample button on the selected sampling device (Figure 1), you can start sampling and making SICK new beats!

For any questions please visit the 'Contact' page or leave a comment below with your email included.


If you are viewing this from another site or feed. Please contribute by viewing the original post here.
http://mrbrandonpeoples.blogspot.com/2011/03/sampling-input-with-kong.html


You can buy Reason 5 and Record 1.5 at amazon.com!
Buy the Reason and Record Duo for a discounted price!

Wednesday, March 23, 2011

Advanced Mixing With Kong

Sequencing a drum track is hard enough, let alone getting your drums to settle in the mix right. When using Kong with standard routing, you're limited to how much power you have over your drum tracks. With the technique I'm going to show you, each Kong pad will have it's own lane in Records SSL mixer. Now, since this technique involves a ton of routing and a guaranteed 5 minute setup at minimum, I have upload the Record file to my FileSwap as a free download. So, download the file, then watch my video and I will explain how everything works in case you want to make your own changes. Here is a link to download the file and a link to watch the video:


http://www.brandonpeoples.com/#/downloadamk/4573074510

Watch on Youtube:
http://www.youtube.com/watch?v=TZUCbEey9xQ


If you are viewing this from another site or feed. Please contribute by viewing the original post here.
http://mrbrandonpeoples.blogspot.com/2011/03/advanced-mixing-with-kong.html


You can buy Reason 5 and Record 1.5 at amazon.com!
Buy the Reason and Record Duo for a discounted price!

Wednesday, March 16, 2011

"Battle of The Stand" Make Your Votes!

93.7 The Fountain has chosen 5 Independent bands from the Kansas City area to compete against each other for an interview at the radio station and be aired on their Saturday night show The Stand. It just so happens that my band Break the Fall is the competition too.
There are two things you need to do to vote:

1. "like" The Stands Facebook Page.

2. "like" the photo of band you want to vote for in the album labeled "Battle of The Stand"

Voting ends before March 26th!

Sunday, March 13, 2011

Resonant Filter!: reason tutorial - dub stab

Resonant Filter!: reason tutorial - dub stab: "how to create a dub sounding stab using reason. thor is connected to an eq then to a reverb. this is where some routing is required to g..."

Friday, March 11, 2011

Vocal Tracks and Home Work (In the Studio I)

This past Wednesday I went to the studio with Break the Fall's singer Gavin to hang while he was recording. This was the third trip I have taken to the studio so it is about time I get some words out about it. To me, being in the studio with the pros working with you is a dream come true. You can spent a year watching videos and reading posts on the internet to gather information to help you understand studio life more, but nothing comes down to spending 10 hours in the studio watching someone who knows what they are doing. In the picture to the right you can see Gavin in the background running through vocals while Matt is running through different vocal effects. If i have learned anything it is how to place vocals and the strategy that it takes to record them. While I'm not revealing specifics about the song we were recording, we did double the vocals throughout the track. One thing I never really took thought in is how powerful doubling vocals can be. Not to mention that you are not just doubling to fill out the sound, but the second vocal track can contain harmonics and effects. Of course, you need to keep in mind that one of the vocal layers needs to be played out more than the other, which is the lead vocal track. The lead vocal track sits just above the guitars and never drowns out the entire mix. The second vocal track whether a harmony or only having effects applied fills out the first layer and says "hey, I'm here, listen to me." Overall you end up with the coolest sounding vocal tracks ever. Gavin always says that the best part about being in the studio is being able to harmonize to him self. When your in the studio you get to experiment. Your not in the studio to just record your track and get done with it. As a band and with the input of the studio we try to one up our selves. We want to make our studio tracks better than what we started with. This way we have something to work towards and we get to be creative with the tracks. The best way to do it is to accept advice from the Audio Engineers that are recording you. There is why they work in the studio and chances are they know what they are doing. Don't forget that you get what you pay for. So, your neighbor that has a iPod recording app is not a favorable choice.

In between watching Matt work his recording magic, sadly, I had homework. If you have ever heard of the saying "mind over matter" then you should find this next statement to contain some humor. My mind was in the studio and my matter was with Anatomy and Physiology. Luckily I was taking notes, so I basically copied the textbook word for word in note taking form. If you're thinking "what does this have to do about music," give me a second, I'm getting to the point. Normally, when my teacher has us take our own notes over the chapter it means we are having a quiz the next day. So, I was content on taking good notes to be ready for the quiz. As it so happens, my teacher was in good spirit and decided not to quiz us. 5 pages of notes wasted. Now, what you have been waiting for, when in the studio you can watch and take notes of what the engineer is doing. You may not use the new techniques and ideas the next day or for quite some time. But, later down the road when the test comes, you will be glad that you were paying attention.


If you are viewing this from another site or feed. Please contribute by viewing the original post here.
http://mrbrandonpeoples.blogspot.com/2011/03/vocal-tracks-and-home-work-in-studio-i.html

Tuesday, March 8, 2011

Showtime at Club D*Mask*Us (On the Road I)

This previous Saturday my band played a show at Club D*Mask*Us and I thought I would share some pictures.

I play keyboard/Synthesizer for the band Break the Fall (Facebook, Myspace, Youtube) and we are currently in the studio recording an EP. Right now we sell our single "Wake Up" as a disc version at our concerts and streamed online on our myspace page. We currently don't have an asking price but instead only ask for a donation of any amount to receive a CD. Even a penny is excepted!
This is the stage we played on. It's a small sized stage, but the drums are back in their own pit surrounded by lights and there is a extension on the front of the stage for the singer or other members to step out on. So, even thought the stage is small, it is flexible and still allowed enough room for movement.
Here is a glimpse of what my live setup looks like and I'll explain everything that is going on. You can't tell from this photo, but the stage is about a foot off of the ground and the keyboard in the background is a Kawai the Club always has set up. The band that played before us used it down off of the stage. In my setup everything runs through my Macbook Pro. Check out this blog post that has a diagram of my setup: My Live Gig Reason and Record Setup. Basically, from my macbook pro, I use the M-Audio Fast Track USB (which can be found in my store) as my audio interface, which the audio outputs are sent to my personal mixer (far left) where my signal is made mono and then sent to the main mix.

I plan on blogging future shows just like this. So, make sure to subscribe to my feedburner to keep up to date!

You can buy Reason 5 and Record 1.5 at amazon.com!
Buy the Reason and Record Duo for a discounted price!


Setting Up an Axiom Pro In Reason & Record

Last week I showed you how to install the Axiom Pro on your mac and the software needed for your controller to communicate with R&R. This week I've put together a video that shows you how to set up the Axiom Pro inside of R&R.
http://www.youtube.com/my_videos?feature=mhum


You can buy Reason 5 and Record 1.5 at amazon.com!
Buy the Reason and Record Duo for a discounted price!

Tuesday, March 1, 2011

My Live Gig Reason and Record Setup

When setting up gear for a live show, the simpler it is, the better it is. Everything routes to my macbook pro in 3 cables! Yet, the setup is very effective. Check it out:


You can buy Reason 5 and Record 1.5 at amazon.com!
Buy the Reason and Record Duo for a discounted price!

Axiom Pro Installation on Mac

If you are not one to read the instruction manual to the gadgets you buy then you might have run into a brick wall with your Axiom Pro. Here is a step-by-step guide on EVERYTHING you need to know while installing your Axiom Pro.


You can buy Reason 5 and Record 1.5 at amazon.com!
Buy the Reason and Record Duo for a discounted price!